Christmas Pinwheel Cookies: Festive, Buttery, and Irresistible
Bring the holiday spirit to your kitchen with these Christmas Pinwheel Cookies. Soft, buttery, and delightfully colorful, these cookies are perfect for holiday gatherings, cookie exchanges, or simply a sweet treat for your family. The iconic swirl of red and green dough, paired with festive nonpareils, makes these cookies as beautiful as they are delicious. This recipe ensures that every bite melts in your mouth while spreading holiday cheer.
Ingredients for Christmas Pinwheel Cookies
- 2 large eggs – Adds richness and helps bind the dough together.
- 2 1/2 cups all-purpose flour – Forms the base structure of the cookies.
- 1/2 tsp baking powder – Provides a slight lift for soft, tender cookies.
- 1/2 tsp salt – Enhances flavor and balances sweetness.
- 3/4 cup granulated sugar – Sweetens and adds slight crunch.
- 3/4 cup powdered sugar – Creates a tender, melt-in-your-mouth texture.
- 3/4 cup salted butter – Contributes richness, flavor, and a tender crumb.
- 2 tsp vanilla extract – Provides warm, aromatic flavor to the dough.
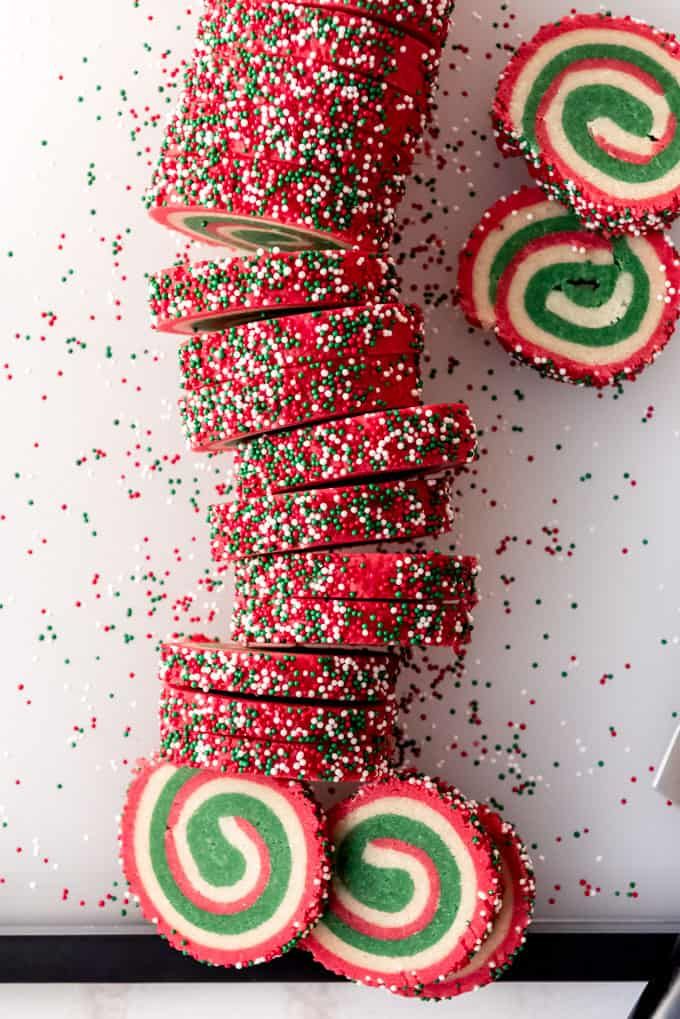
- Gel food coloring (red & green) – Creates the festive swirls.
- Holiday colored nonpareils – Adds a playful, decorative touch.
Step-by-Step Instructions
- Prepare the dough: In a large bowl, cream together butter, granulated sugar, and powdered sugar until light and fluffy. Beat in the eggs and vanilla extract until fully incorporated.
- Mix dry ingredients: In a separate bowl, whisk together all-purpose flour, baking powder, and salt. Gradually add to the wet mixture, mixing until a smooth dough forms.
- Divide and color the dough: Split the dough into three equal portions. Leave one portion plain, and color the other two with red and green gel food coloring to create festive swirls.
- Shape the pinwheels: Roll each colored dough portion into a rectangle of equal thickness. Layer the doughs together, gently pressing to adhere. Roll the stacked dough into a tight log, creating the classic pinwheel swirl.
- Chill the dough: Wrap the log in plastic wrap and refrigerate for at least 2 hours. Chilling makes slicing easier and helps cookies maintain their shape.
- Preheat and slice: Preheat your oven to 350°F (175°C). Slice the chilled dough into 1/4-inch thick rounds and place them on a parchment-lined baking sheet.
- Add nonpareils: Lightly press holiday colored nonpareils onto the top of each cookie for a festive touch.
- Bake: Bake for 10-12 minutes, or until edges are just beginning to turn golden. Allow cookies to cool on the baking sheet for 5 minutes before transferring to a wire rack.
Pro Tips for Perfect Christmas Pinwheel Cookies
- Use gel food coloring instead of liquid for vibrant, non-runny swirls.
- Keep your rolling thickness consistent for even baking and beautiful pinwheels.
- Chill the dough for at least 2 hours, or overnight, to make slicing easier and prevent spreading.
- Store cookies in an airtight container at room temperature to keep them soft and fresh for up to 1 week.
Serving Suggestions
These Christmas Pinwheel Cookies are perfect on a holiday cookie platter, paired with hot cocoa, eggnog, or tea. They also make beautiful edible gifts when wrapped in festive cellophane and tied with ribbon. Their colorful swirl and soft, buttery texture make them a hit with both children and adults.
Conclusion
Creating Christmas Pinwheel Cookies is a joyful and straightforward way to celebrate the season. With simple ingredients, festive colors, and easy steps, these cookies bring warmth and cheer to your holiday table. Every bite offers a tender, buttery texture combined with the iconic red and green swirl that makes them instantly recognizable. Whether for gifting, decorating, or simply indulging, these cookies are a holiday classic that’s easy to make and impossible to resist. Celebrate the season with this delicious, festive, and fun-to-make cookie recipe and watch smiles light up around your table!