The Ultimate Gourmet Holiday Cookie Box: 6 Festive Variations from One Master Recipe
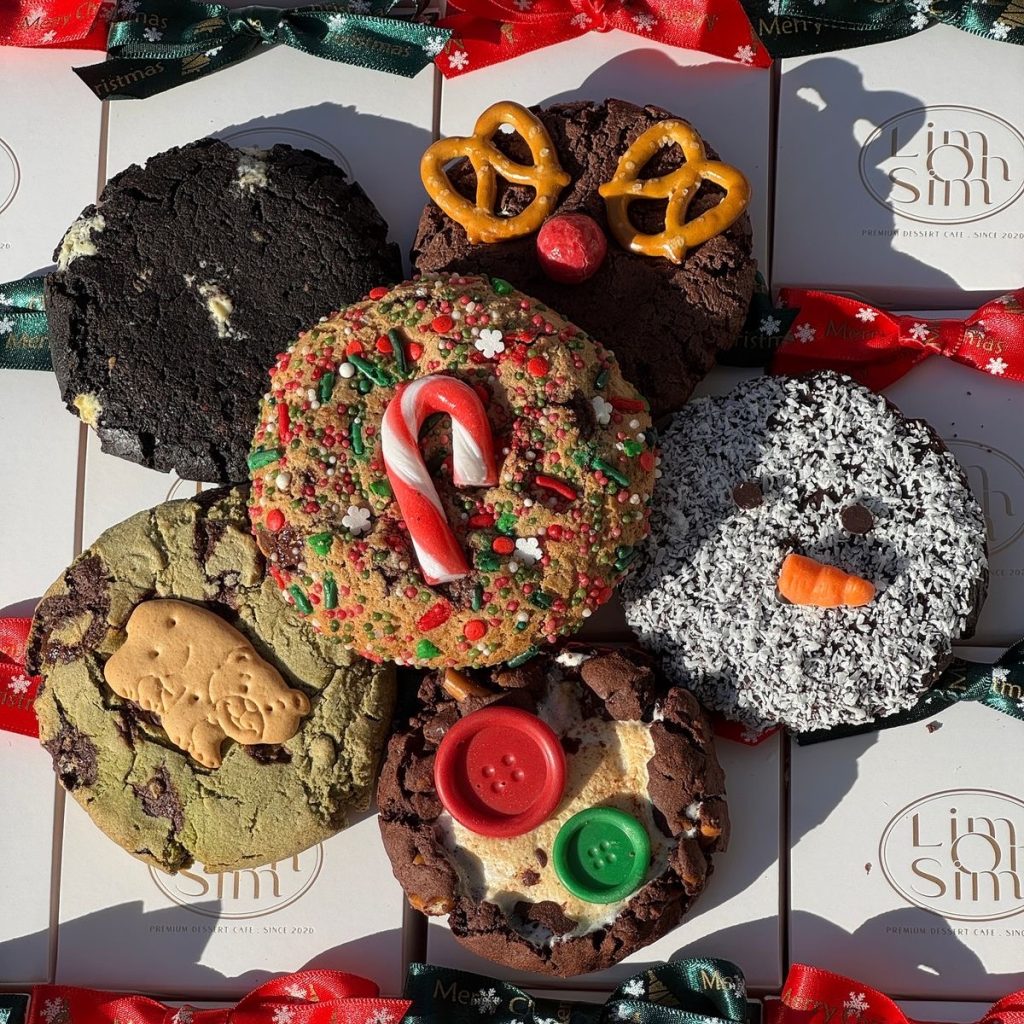
There is nothing quite like the magic of a handmade holiday cookie box. It is more than just a sweet treat; it is a tactile expression of love, nostalgia, and the warmth of the season. Looking at these stunning cookies, you see an array of textures and characters—from the whimsical Reindeer Chocolate Cookie to the elegant Matcha Teddy Bear and the snowy, coconut-dusted Snowman.
But here is the secret that high-end bakeries don’t tell you: you don’t need six different recipes to create this masterpiece.
This guide will teach you how to make a luxury, bakery-style cookie base—thick, chewy, and impossibly soft—and how to customize it into the stunning assortment seen here. These cookies feature the perfect balance of crispy edges and gooey centers, ensuring they aren’t just cute; they are culinary triumphs. Whether you are gifting them in ribbon-tied boxes or setting them out for Santa, these cookies are guaranteed to be the star of your Christmas.
The Ingredients: The Science of the Perfect Cookie
To achieve that thick, Levain-style texture, precision is key. Here is what you need and, more importantly, why you need it.
- Cold, Unsalted Butter (cubed): Unlike most recipes that call for room temperature butter, using cold butter prevents the cookies from spreading too thin in the oven. It creates small pockets of steam, resulting in a taller, flakier texture.
- Cake Flour & All-Purpose Flour Blend: A mix of cake flour (low protein) and standard flour creates a tender crumb that isn’t cakey but is incredibly soft. This is the secret to “melt-in-your-mouth” cookies.
- Dark Brown Sugar: High molasses content is non-negotiable here. It provides moisture, chewiness, and that deep, caramel-like richness that defines a gourmet cookie.
- High-Quality Cocoa Powder (Dutch-Process): For the chocolate variants (Reindeer, S’mores, Snowman), Dutch-process cocoa offers a smoother, less acidic, and intensely fudgy flavor profile.
- Cornstarch: A bakery trick! A small amount of cornstarch keeps the cookies soft for days, ensuring your gift boxes taste fresh even after delivery.
- Eggs: Provide structure and richness. We use cold eggs to maintain the dough’s temperature.
- Baking Soda & Baking Powder: The dual leavening agents ensure the cookie rises (powder) and spreads just enough (soda) for that crinkled, rustic top.
The Mix-ins & Toppings
- Mini Pretzels & Red Chocolate Balls: For the Reindeer antlers and nose.
- Desiccated Coconut & Orange Fondant: For the Snowman’s snowy texture.
- Candy Canes: For the festive center cookie.
- Matcha Powder: For the green tea variation.
- Teddy Bear Biscuits: To top the Matcha cookies.
- Large Chocolate Buttons: For the “Sewing Button” S’mores look.
Step-by-Step Instructions
This method uses a Master Dough approach. We will make a base, split it, and customize.
Phase 1: The Master Base (Yields 12 Giant Cookies)
- Cream the Butter: In a stand mixer fitted with the paddle attachment, beat the cold butter and sugars (brown and white) on medium speed for about 4 minutes. You want a mixture that is fluffy but still holds its shape.
- Add Wet Ingredients: Add the eggs one at a time, followed by vanilla extract. Mix until just combined. Do not overbeat.
- Dry Ingredients: In a separate bowl, whisk together flours, cornstarch, baking soda, baking powder, and salt.
- Combine: Gradually add the dry ingredients to the wet mixer on low speed. Stop when there are still a few streaks of flour visible.
Phase 2: The Flavor Split
Divide your dough into three bowls to recreate the collection:
- Bowl A (The Chocolate Base): Fold in Dutch-process cocoa powder (approx. ½ cup) and dark chocolate chunks. This creates the base for the Reindeer, Snowman, and S’mores/Button cookies.
- Bowl B (The Vanilla Confetti Base): Fold in festive red and green sprinkles and white chocolate chips. This is for the Candy Cane center cookie.
- Bowl C (The Matcha Base): Fold in high-grade culinary matcha powder (approx. 2 tbsp) and semi-sweet chocolate chunks. This is for the Teddy Bear cookie.
Phase 3: Assembly & Baking
- Shape: Weigh your dough balls to roughly 4-6oz (115g-170g) each. These are jumbo cookies. Keep them tall and rough; do not roll them into perfect spheres.
- Decorate (Pre-Bake):
- Reindeer: Press two mini pretzels into the top for antlers.
- Candy Cane: Nestle a mini candy cane into the center of the sprinkle dough.
- Matcha: Press a teddy bear biscuit gently into the center.
- Button/S’mores: Press large red and green chocolate buttons (or fondant shapes) into the chocolate dough.
- Chill: This is crucial. Freeze the shaped dough for at least 30 minutes. This ensures they stay thick.
- Bake: Preheat oven to 410°F (210°C). Bake for 9-11 minutes. They should look slightly underbaked in the center.
- Decorate (Post-Bake):
- Snowman: Once the plain chocolate cookie cools, dip the face in melted white chocolate or glaze, then press into a bowl of shredded coconut. Add chocolate chips for eyes and a small orange candy for the nose.
- Reindeer: Use a dab of melted chocolate to stick a red candy ball (nose) in the center.
Why This Recipe is Loved
This specific recipe collection captures the essence of “Instagrammable” food without sacrificing flavor.
- Visual Storytelling: The variety of characters (the Snowman, the Reindeer) tells a story in a box, making it the perfect DIY Christmas Gift.
- Textural Contrast: From the crunch of the pretzel antlers to the soft fluff of the coconut and the snap of the teddy bear biscuit, every bite offers a new experience.
- Bakery Quality at Home: By using the “cold butter method” and high temperatures, you achieve that professional, thick-cookie look that usually costs $5 a pop at a boutique bakery.
Pro Tips for Perfection
- Don’t Overbake: The cookies will continue to cook on the hot baking sheet after you pull them out. Remove them when the edges are golden but the center looks soft. This ensures a fudgy interior.
- The “Scoot” Method: Immediately after pulling the pan from the oven, place a large round cookie cutter or glass over each cookie and gently swirl it in a circular motion. This rounds out any uneven edges for a perfectly circular shape.
- Ingredient Temperature: Ensure your eggs are cold and your butter is cold. If the dough gets warm while you are decorating, pop it back in the fridge before baking. Warm dough = flat cookies.
- Vibrant Colors: For the Matcha cookies, use high-quality matcha to ensure a vibrant green color rather than a dull olive tone.
Serving Suggestions
To fully embrace the cozy holiday vibe seen in the photo:
- The Gift Box: Line a white box with parchment paper. Place the cookies snugly together so they don’t slide. Add a festive red or green ribbon for the ultimate presentation.
- The Pairing: Serve these warm with a glass of cold milk, or for the adults, a cup of spiced eggnog or a hot coffee to cut through the richness of the chocolate.
A Sweet Conclusion
Baking this Holiday Cookie Box is about more than just sugar and flour; it is about creating a moment of joy. Whether you are biting into the coconut-dusted sweetness of the Snowman or the salty-sweet crunch of the Reindeer, these cookies are designed to impress. They are simple enough for a novice baker but yield results that look professionally curated.
Gather your ingredients, turn on the holiday music, and fill your kitchen with the scent of chocolate and vanilla. Happy Baking!