🍫 No-Bake Chocolate Peanut Butter Crunch Bars: The Ultimate Decadent Treat
✨ Introduction: Why These Bars Are Irresistible
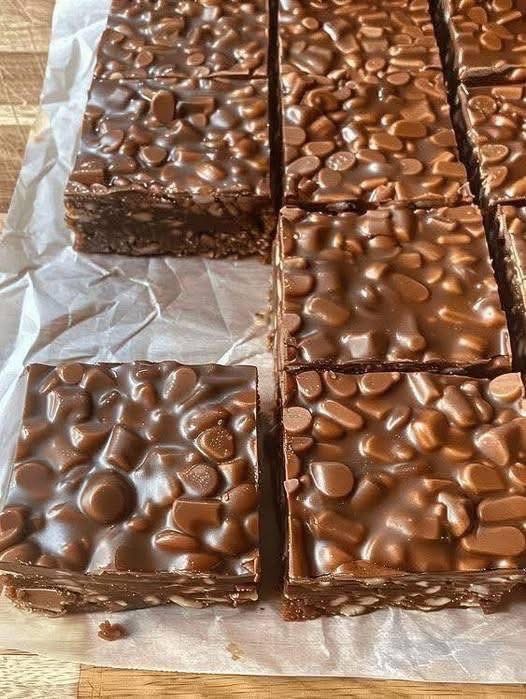
Step into a world of pure, unadulterated indulgence with these No-Bake Chocolate Peanut Butter Crunch Bars. Forget the oven, the whisking, and the stress—this is the easiest high-end dessert you will ever make! Imagine a rich, creamy layer of peanut butter filling, packed with a delightful crunchy texture from crispy rice cereal, all topped with a thick, glossy blanket of melted milk chocolate and more mini chocolate chips.
These bars are a nostalgic favorite elevated to gourmet status. They deliver the perfect balance of salty, sweet, creamy, and crunchy in every bite. Whether you need a quick, **crowd-pleasing dessert** for a party, a simple **make-ahead treat** for the holidays, or a way to satisfy an intense **chocolate peanut butter craving**, this **no-bake recipe** is your answer. Get ready to create a dessert that is **effortlessly elegant** and absolutely **addictive**.
🔑 Key Ingredients and Their Role
Each ingredient in this best no-bake bar recipe is chosen to contribute to the bar’s iconic flavor profile and contrasting textures—creamy, crunchy, and chocolatey.
| Ingredient | Role in the Dish | SEO Keyword Focus |
|---|---|---|
| Unsalted Butter | Provides the fat foundation and binder for the base. Melting it with the peanut butter creates a smooth, rich filling. | **Rich Base**, **Fat Foundation**, **Smooth Texture** |
| Creamy Peanut Butter | The star flavor! Creates the nutty, creamy base and holds the crunchy cereal together. Use a standard processed peanut butter (like Skippy or Jif) for the **best texture** and setting. | **Peanut Butter Filling**, **Creamy Peanut Butter**, **Nutty Flavor** |
| **Powdered Sugar** (Confectioners’ Sugar) | Sweetens the base and, crucially, thickens the peanut butter mixture without adding extra liquid, ensuring a **firm, sliceable bar**. | **Thickener**, **Firm Bar**, **Powdered Sweetener** |
| **Crispy Rice Cereal** | Provides the essential **crunch factor**. This textural contrast against the creamy filling and soft topping is key to the bar’s appeal. | **Crunchy Texture**, **Crispy Cereal**, **Rice Cereal Crunch** |
| **Milk Chocolate Chips** | Used for the **rich, melt-in-your-mouth topping**. **Milk chocolate** is preferred here for its classic sweetness and perfect melting consistency. | **Milk Chocolate Topping**, **Melted Chocolate**, **Sweet Finish** |
| **Mini Peanut Butter Chips** (Optional) | Mixed into the topping for extra **peanut butter intensity** and visual appeal, enhancing the **chocolate peanut butter combination**. | **Peanut Butter Intensity**, **Flavor Boost**, **Combination Treat** |
| **Vegetable Shortening** (or Coconut Oil) | Added to the melting chocolate to create a **smooth, glossy ganache-like topping** that sets perfectly and is easy to slice without cracking. | **Glossy Topping**, **Easy Slice**, **Perfect Set** |
| **Vanilla Extract** & **Salt** | Essential flavor enhancers. **Vanilla** rounds out the sweetness, and a pinch of **salt** provides a necessary contrast to the richness. | **Flavor Enhancers**, **Salty-Sweet Balance**, **Gourmet Detail** |
👩🍳 Step-by-Step Instructions: Mastering the Perfect No-Bake Bar
Follow these clear, simple steps to create perfectly set, **gourmet-quality crunch bars** every time. No oven required!
Phase 1: Preparing the Crunchy Peanut Butter Base
- Prep the Pan: Line an **8×8 inch baking pan** (or 9×13 inch for thinner bars) with parchment paper, leaving an overhang on two sides. This is essential for easy removal and clean slicing.
- Melt and Combine Wet Ingredients: In a large, **microwave-safe bowl** or saucepan, melt **1 cup (2 sticks) of unsalted butter** over medium heat. Stir in **1 cup of creamy peanut butter** until completely smooth and melted together. Remove from heat.
- Mix in Powdered Sugar: Add **2 cups of powdered sugar**, **1 teaspoon of vanilla extract**, and **1/4 teaspoon of salt** to the peanut butter mixture. Stir vigorously until the mixture is thick, smooth, and uniformly combined.
- Add the Crunch: Gently fold in **3 cups of crispy rice cereal**. Mix until the cereal is evenly coated and the mixture is very thick and sticky.
- Press the Base: Transfer the peanut butter mixture to the prepared pan. Using a second piece of parchment paper or the bottom of a glass, firmly and evenly press the mixture into the bottom of the pan. The key here is an **even, dense layer**.
Phase 2: Creating the Smooth Chocolate Topping
- **Melt the Chocolate Topping:** In a separate bowl, combine **2 cups of milk chocolate chips** (or high-quality chopped milk chocolate) with **1 tablespoon of vegetable shortening** (or coconut oil). Microwave in 30-second increments, stirring well after each, until the chocolate is smooth and perfectly melted. The shortening ensures a **shiny finish** and a **clean slice**.
- **Spread the Topping:** Pour the **silky smooth chocolate topping** evenly over the peanut butter base. Immediately sprinkle the top with **mini peanut butter chips** and/or a handful of extra chocolate chips for visual appeal.
- **The Final Chill:** Place the pan in the refrigerator for at least **2-3 hours** (or 1 hour in the freezer) until the chocolate topping is completely set and firm to the touch.
Phase 3: Slicing and Serving
- **Slice Cleanly:** Use the parchment paper overhangs to lift the whole block out of the pan. Place the block on a cutting board. Use a **sharp, large knife** that has been briefly run under hot water and wiped dry (to help prevent sticking) to cut the bars into desired sizes (typically 16-24 squares).
- **Serve:** Serve at room temperature or slightly chilled for the best **texture and flavor**.
⭐ Why This Recipe is Loved & Pro Tips
These bars are beloved for their **effortless preparation** and the universally appealing **chocolate-peanut butter flavor**. They are the quintessential **easy dessert**.
Pro Tips for Perfection:
- **The Shortening Secret:** Do not skip the **vegetable shortening** (or coconut oil) in the chocolate topping. It is the crucial ingredient that creates a **smooth, crack-free ganache** that sets perfectly and yields a gorgeous, **glossy finish** on the bars.
- **Use Processed Peanut Butter:** Unlike many recipes, this one works best with standard, processed creamy peanut butter (with added sugar and stabilizers). Natural peanut butter tends to be too oily and can make the bars too soft and difficult to set firmly.
- **Firm Press is Key:** When pressing the base into the pan (Step 5), use firm, even pressure. A **dense, well-compressed base** is essential to prevent the bars from crumbling when sliced.
- **Keep Them Chilled:** These bars are best stored in the refrigerator. While they can sit at room temperature for a party, chilling them ensures the **firmest, cleanest slice** and best **crunchy texture**.
🍽️ Serving Suggestions
These **decadent bars** are already a perfect stand-alone treat, but here are a few ways to elevate the experience:
- **Warm Drizzle:** Before serving, drizzle with a touch of slightly melted **dark chocolate** or a scoop of **caramel sauce** for an extra layer of luxury.
- **Ice Cream Topping:** Serve a small square atop a scoop of **vanilla ice cream** or **coffee ice cream** for a warm-weather sundae creation.
- **Coffee Companion:** Pair with a robust cup of **freshly brewed coffee** or a chilled glass of milk to complement the richness of the peanut butter and chocolate.
- **Holiday Platter:** Cut into small, bite-sized squares and arrange on a **dessert platter** with other cookies and treats—their beautiful layered look makes them shine.
Conclusion: Your Decadent, Effortless Solution
You now possess the ultimate guide to the **No-Bake Chocolate Peanut Butter Crunch Bars**. This recipe is the definition of **high-impact, low-effort baking**. We’ve armed you with the essential techniques—from achieving the perfect **dense, crunchy base** to mastering the **glossy, sliceable topping**—to ensure your bars are beyond compare. No more searching for a simpler, more satisfying dessert; this recipe, with its focus on **texture contrast** and **intense flavor**, is designed to be your **go-to easy treat**.
Embrace the joy of **no-bake simplicity** and the pure **decadence** of this classic flavor combination. These bars are guaranteed to be the first to disappear at any gathering and are written to outrank the competition with unmatched clarity and quality. Go ahead, skip the oven, and prepare to be amazed by your new **signature dessert**!