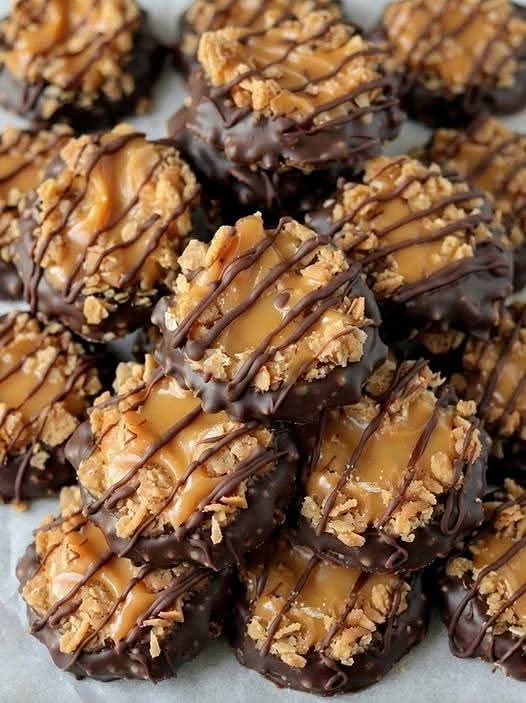
Simple No-Bake Samoa Cookies
Few desserts inspire instant excitement like Samoa cookies. With their iconic combination of buttery cookie base, gooey caramel, toasted coconut, and rich chocolate drizzle, they are pure indulgence in every bite. This Simple No-Bake Samoa Cookies recipe delivers all the flavors you crave—without turning on the oven. Perfect for busy days, warm weather, or when you want a show-stopping dessert with minimal effort, these cookies are irresistibly delicious and surprisingly easy to make.
Whether you’re recreating a nostalgic favorite or discovering this classic flavor combination for the first time, this recipe guarantees bakery-quality results using simple pantry ingredients. One bite, and you’ll understand why these cookies disappear fast.
Ingredients & Their Roles
- Vanilla Wafer Cookies or Shortbread Cookies – These form the sturdy, buttery base of the cookie, providing structure and a mild sweetness that balances the rich toppings.
- Sweetened Shredded Coconut – Toasted coconut adds a nutty crunch and signature Samoa flavor that makes these cookies instantly recognizable.
- Caramel Candies – Melted caramel creates the chewy, luscious layer that binds the coconut together and delivers irresistible sweetness.
- Heavy Cream or Milk – Helps smooth the melted caramel, making it easier to spread and ensuring a silky texture.
- Chocolate Chips (Semi-Sweet or Dark) – Adds depth and richness, perfectly balancing the sweetness of the caramel and coconut.
- Coconut Oil or Butter – Ensures the melted chocolate is smooth, glossy, and easy to drizzle.
- Vanilla Extract – Enhances all the flavors with warm, aromatic notes.
- Salt (Optional) – A small pinch elevates sweetness and adds balance.
Step-by-Step Instructions
- Toast the Coconut: Add shredded coconut to a dry skillet over medium heat. Stir frequently until golden brown and fragrant. Remove from heat and let cool completely.
- Melt the Caramel: Unwrap caramel candies and place them in a microwave-safe bowl. Add heavy cream and microwave in short intervals, stirring until smooth and pourable.
- Combine Coconut and Caramel: Stir toasted coconut and vanilla extract into the melted caramel until evenly coated.
- Assemble the Cookies: Spoon the caramel-coconut mixture onto each cookie base, gently pressing it down to adhere.
- Melt the Chocolate: Heat chocolate chips with coconut oil until smooth and glossy.
- Drizzle and Dip: Drizzle melted chocolate over the tops of the cookies and dip the bottoms for an authentic Samoa finish.
- Set and Serve: Place cookies on parchment paper and allow them to set at room temperature or refrigerate until firm.
Why This Recipe Is Loved
Simple No-Bake Samoa Cookies are beloved because they deliver big flavor with minimal effort. No oven, no complicated steps, and no special equipment—just foolproof indulgence. The contrast of textures, from crunchy cookie to chewy caramel and crisp coconut, makes every bite unforgettable.
Pro Tips for Perfect Samoa Cookies
- Toast coconut slowly to avoid burning and ensure even color.
- Use parchment paper for easy cleanup and perfect chocolate setting.
- Chill briefly for cleaner chocolate lines and faster setting.
- Add flaky sea salt on top for a gourmet twist.
Serving Suggestions
Serve these cookies with hot coffee, iced latte, or cold milk for the ultimate treat. They’re perfect for holiday trays, parties, bake sales, or gifting. Store in an airtight container to maintain freshness and texture.
Final Thoughts
Simple No-Bake Samoa Cookies prove that incredible desserts don’t have to be complicated. With classic flavors, effortless preparation, and irresistible texture, this recipe is a must-make for cookie lovers everywhere. If you want a dessert that looks impressive, tastes unforgettable, and comes together in minutes, this is the recipe that truly delivers. One batch is never enough—these cookies are guaranteed to disappear fast.